Codeberg Actions: CI/CD with Forgejo Runner registered with Codeberg.org running on OpenSuSE MicroOS hosted on Hetzner
If you find any issues with the instructions then do not hesitate to create an issue hereChangelog
| Date | Description |
|---|---|
| 2026-06-07 | Upgrade Forgejo Runner to 12.10.2 |
| 2026-06-07 | Update forgejo-runner fetch_timeout (60 seconds) and fetch_interval (5s) for codeberg.org as the runner otherwise gets a timeout and cannot be used anymore. We recommend you create a server from scratch based on these instructions |
| 2025-09-14 | Forgejo Runner needs for the Actions cache now also proxy_port configured. We recommend you create a server from scratch based on these instructions or update the config.yml file of the runner and the .container file. Additionally delete all files in the cache directory (/var/tmp/forgejo-runner/data) to avoid the error "the index repo does not exist" |
| 2025-09-13 | Upgrade Forgejo Runner to 11.0.0 |
| 2024-12-23 | Upgrade Forgejo Runner to 6.0.1. Include some information on the implication to use host network and podman socket mount. We recommend you create a server from scratch based on these instructions |
| 2024-12-23 | Upgrade Forgejo Runner to 5.0.4. Change labels from Docker to Podman. Changed checkout action in example to latest version (v4). We recommend you create a server from scratch based on these instructions |
| 2024-12-06 | Use new Podman 5.3 feature to wait for network in rootless mode to ensure connectivity is availble on startup: podman-user-wait-network-online.service. We recommend you create a server from scratch based on these instructions or update the .container file |
| 2024-11-23 | Updated Forgejo Runner to 5.0.2. See upgrade section for instructions to upgrade |
| 2024-01-04 | Changed instructions to use Quadlet (see also podman-systemd) - a native integration of podman and systemd. This has multiple advantages such as simplification, auto-updates and declarative definition of the containers (you can even use kubernetes yml). We strongly recommend you create a server from scratch based on these instructions. |
| 2023-12-27 | Extended instructions on how to build containers inside an Action pipeline without requiring exposure of /dev/fuse for increased security (see also Annex if you want to use fuse and accept the security risk). We recommend you create a server from scratch based on these instructions. Include also an example to build a container in an Action pipeline (see here). |
| 2023-12-26 | Extended instructions on how to make an action cache available (only use it if you have one runner/host and the host is protected by an outside firewall!). We recommend you create a server from scratch based on these instructions. Include also an example to build a container in an Action pipeline (see here). |
| 2023-12-25 | Extended instructions on how to use container images in a Codeberg actions. This means you can load in your pipeline any container image that contains the tools you need (Java, Rust etc.). We recommend you create a server from scratch based on these instructions. |
| 2023-12-23 | Initial tutorial using IPv6 only with a forgejo-runner running in rootless mode in podman in a OpenSuse MicrOS VM. Demonstration based on a simple Action pipeline triggered via Codeberg.org |
Introduction
codeberg.org is a free open source git service hosted in Europe. It is based on Forgejo.
Everyone can publish open source projects or contribute to existing open source projects.
Additionally, we show how to do a rootless container deployment with podman. This is much more secure than using the default priviledged/root based deployment of Docker.
Furthermore, all runner data is stored on a dedicated partition, so that a pipeline cannot fill all disk space so that operating system updates become impossible. We use Quadlet (see also podman-systemd) to simply, secure and auto-update the setup.
One important aspect of developing software is to use continuous integration (CI)/continuous deployment (CD) services.
codeberg.org supports using CI/CD pipelines (called Actions) that automatically build and deploy your application, but you have to provide a so-called Forgejo runner, ie a virtual machine (VM) that runs the pipeline.
We will explain in this tutorial how to install such a runner using a VM based on OpenSuSE MicroOS using an IPv6-only setup provided by the European cloud provider Hetzner. OpenSuSE MicroOS updates itself every 24 hours automatically. If updates fail the system repairs itself automatically based on a previous snapshot. You can use any cloud provider or even your on-premise data centre.
The steps here are manual steps, but I strongly recommend to automate them, e.g. using Hetzner Cloud config and/or Terraform or similar, so you can easily add additional VMs or rebuild the whole environment in a reproducible manner.
Important Security hint: Let only trusted developers and trusted packages use your Actions CI/CD pipelines. Otherwise malicious actors may impersonate your runner and get access to the secrets within your CI/CD workflow.
Important: You pay for any resource that you create in Hetzner. A VM costs still money if shutdown. You need to delete it if you do not want to pay further. If your VM is not constantly running then keep in mind that you need to trigger security updates manually.
Why OpenSuSE MicroOS?
OpenSuSE MicroOS is a new generation of immutable Linux distributions running isolated container loads.
Contrary to the traditional Linux distributions they are designed to run highly isolated workloads with minimal software installations in a wide range of scenarios, such as low-resource edge devices or large-scale compute clusters.
Note: Do not confuse them with minimalistic Linux distributions, such as Alpine Linux. These are like traditional Linux distributions, but with only little preinstalled software.
The processes in a container-based Linux distribution running on a host are isolated using container technologies.
This means they do not infere with each other at network, storage, CPU and memory level unless configured. However, although they are isolated you should not run different pipelines of different confidentiality levels of possibly different organizational units and/or different organization on the same host.
They may have different trust to each other, different legal obligations (e.g. privacy) or require a higher isolation than container technologies can offer.
Additionally, any upgrades to the host operating system are transactional, ie can be automatically undone, if erroneous.
This is facilitated by new file systems, such as Btrfs, that take automatically snapshots of the filesystem that can be recovered to any point in time in-place.
This is not only more secure, but also enables another requirement of CI/CD pipelines: Reproducibility.
A pipeline always starts with the same preconditions and will always run the same.
Minimal software installation also implies that this is more secure and additionally you can choose to run different environments/software versions in parallel for a CI/CD pipeline, which is important for automated reproducible testing.
Finally, OpenSuSE MicroOS automatically updates itself every 24 hours (frequency can be changed) - this is especially important for CI/CD runners which are often forgotten/neglected.
There are alternatives to OpenSuSE MicroOS:
- SuSE Linux Micro - a commercial variant of OpenSuSE MicroOS
- Ubuntu Core - targeting Edge devices
- Fedora Onyx
- Fedora Container Linux (formerly known as CoreOS)
Cloud Provider Hetzner
I choose in this tutorial Hetzner as a cloud provider as it is a low-price European cloud provider.
However keep in mind that you should choose the cloud provider according to your enterprise needs and this could be different from the needs of a tutorial.
For example, you should take into account risks, security, costs, skills and compliance (e.g. General Data Protection Regulation (GDPR)).
Hetzner allows you to easily start with own virtual networks and servers. Besides standard x86-64 servers it allows also to use ARM64 - based servers.
The latter are usually much cheaper to run and more energy efficient.
While we show in this tutorial how to run a Forgejo runner on a standard x86-64 server, you are encouraged to try an ARM server for said reasons.
Please configure your cloud access with 2-Factor Authentication (2FA) (see Hetzner documentation) to increase your security and reduce likelyhood of account misuse.
Making the OpenSuSE MicroOS image available in Hetzner
Hetzner has only a certain selection of installation images (ISO) available for servers. While OpenSuSE is among them, it does not include currently by default OpenSuSE MicroOS.
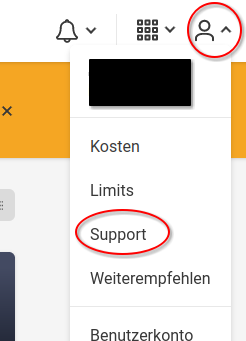
However, adding one is easy. Create a new project (see below). Then, just write the technical support in the web interface a message with a direct link to the OpenSuSE MicroOS image (see here) and ask it to be included in all your cloud projects.
Do not forget to mention the architecture for which the image is, otherwise it may be added to the wrong one and you cannot use it.
After they have added it you are ready to use it for creating a server.
You do not need always the most recent one, because after installation you can easily upgrade it via Internet from the official repositories.
Hetzner: Create a new project
Before we can create a server, we should create a new project in the Hetzner Cloud Console. A project is a grouping of cloud resources, such as networks, firewalls and servers. You may want to group them according to different organizational units or confidentiality aspects. Also for providing web appliactions you may want to use them to distinguish between different environments, such as development, test, staging and production. After login just click on the field "Create a new project". Give it a meaningful name, e.g. "Codeberg Forgejo runner". Projects itself do not cost anything, but you have of course to pay for any resource you add to the project.
Hetzner: Configure the virtual network and firewall
After you have created your project, you should add a private network to it. This will facilitate the communication of your Forgejo runner with private servers that do not have a connection to the Internet for security reasons.
The Forgejo runner needs only access to the Internet if it runs with an Internet service, such as codeberg.org or if your build processes need to access repositories on the Internet.
I strongly recommend for enterprise scenarios to make Internet access (outgoing/incoming) impossible - this will reduce your attack surface significantly.
This of course would also mean that you install Forgejo in your private network and that you proxy Internet software repositories, such as Maven, Container Registries, Pypi etc.
However, in this tutorial we connect the Forgejo runner with the Internet to be able to suse it with codeberg.org.
It is highly recommended that this private network has no overlapping private IP address ranges with your other projects/networks so you can route between them properly...
Go to Networks
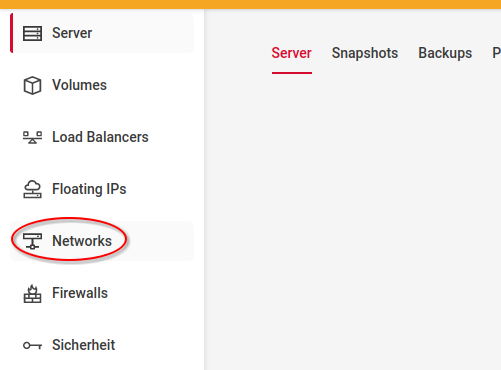
Create a new private network with the followig parameters:
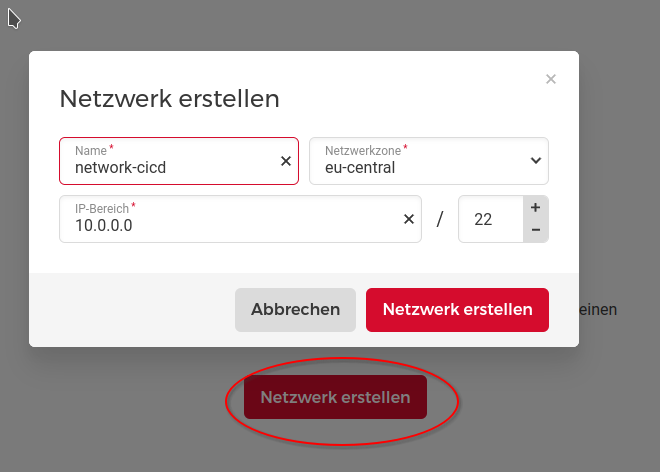
We choose a CIDR of 22, which allows 1024 private IP addresses in your private network.
The next thing we are going to configure is the firewall. We do not configure it at the operating system level, but at the cloud level.
This can be more secure, because if someone takes over the host then they cannot manipulate the firewall. Thus this reduces the impact of the attack.
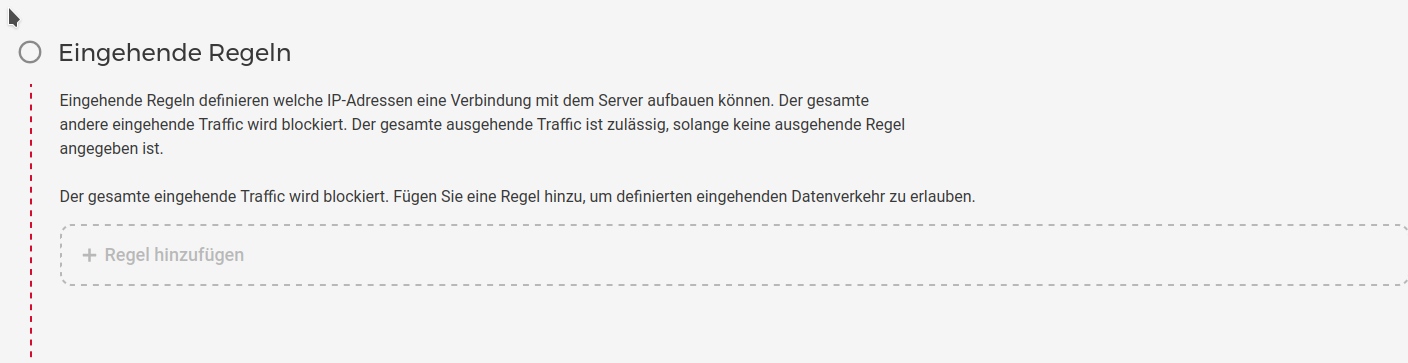
We do NOT allow any incoming traffic here (also not SSH), because this reduces the attack surface significantly. Hetzner allows to redirect the server screen directly to the browser (VNC Console), ie no incoming SSH is needed. This improves significantly the security.
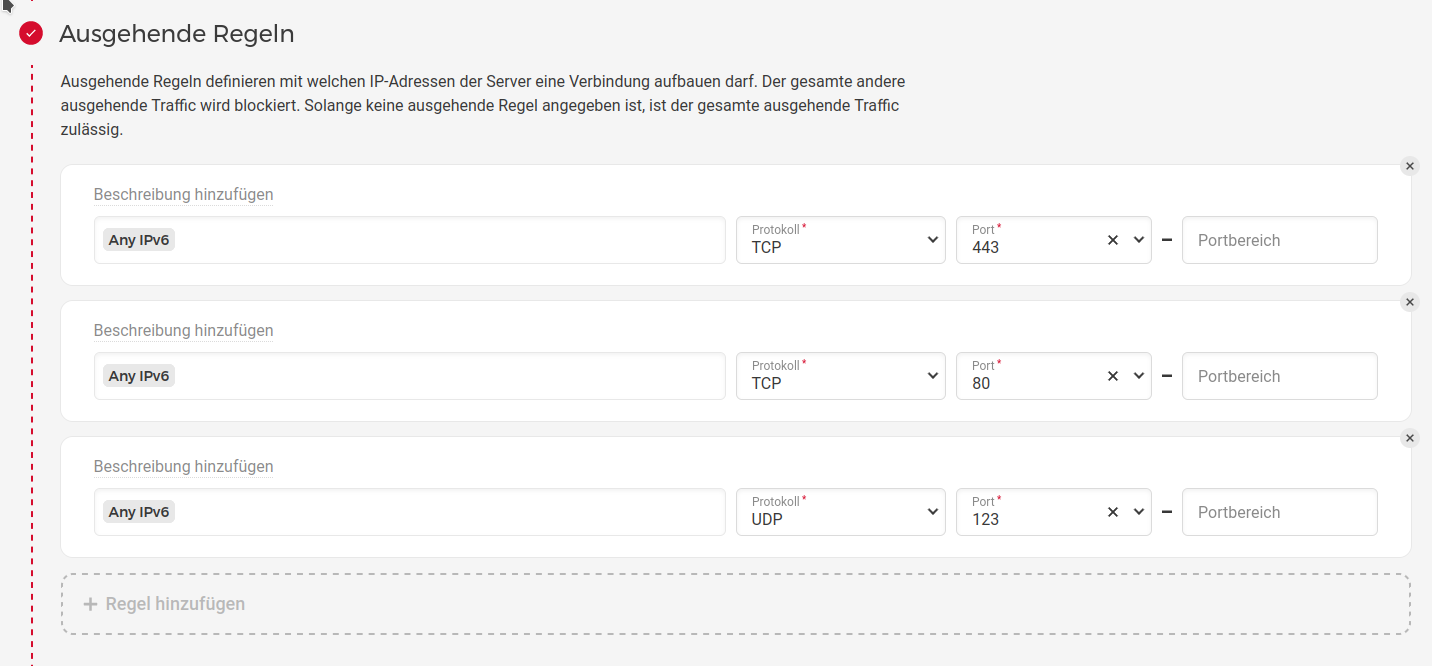
However, for simplicity reasons we do allow any outgoing traffic on TCP Port 443. This is needed to connect to codeberg.org, but also possibly to software repository. Generally, from an enterprise security viewpoint, you should also restrict outgoing traffic to the Internet
You can simply add a new firewall in the Hetzner cloud web interface:
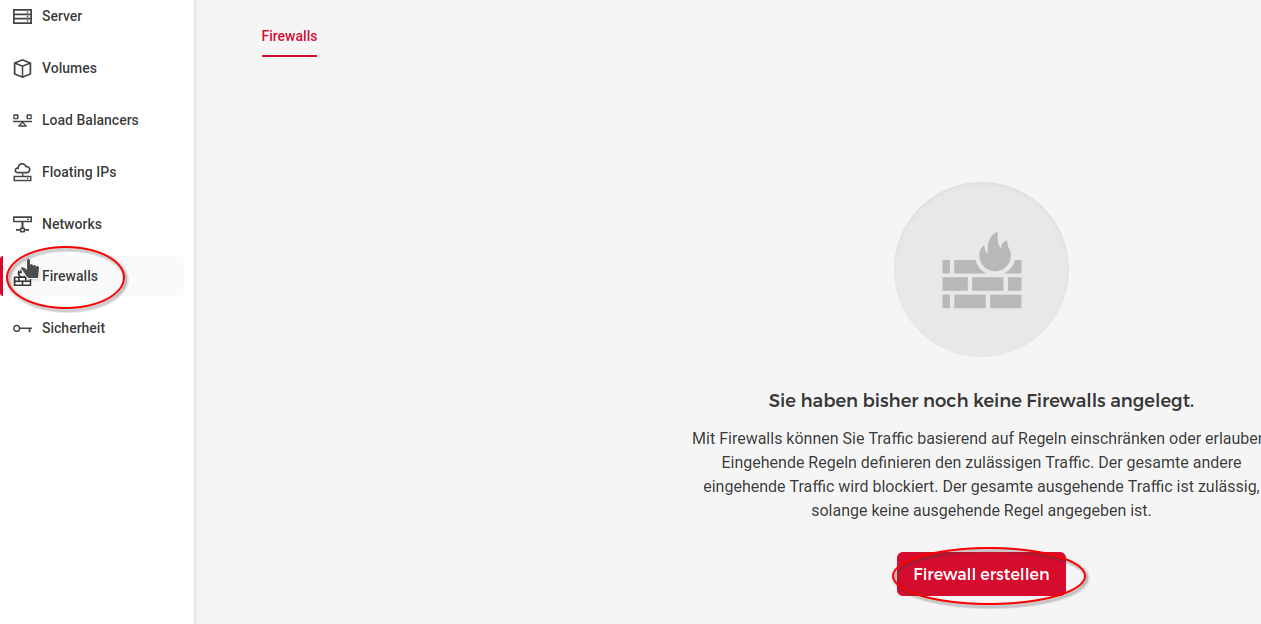
Click on "Create Firewall"
Make sure that you REMOVE all incoming rules.
Click for outgoing rules on "Add a new rule".
Configure the following rules that only allows outgoing IPv6 traffic
- on TCP port 443 (HTTPS) - this is needed to connect to codeberg.org, software repositories of OpenSuSE MicroOS and software repositories used by your pipeline
- on TCP port 80 (HTTP) - this is only needed for the installation
- on UDP port 123 (NTP) - this is needed to connect to your preferred timeserver (make sure it uses TLS!). It is very important that the time on the server is well-synchronized.
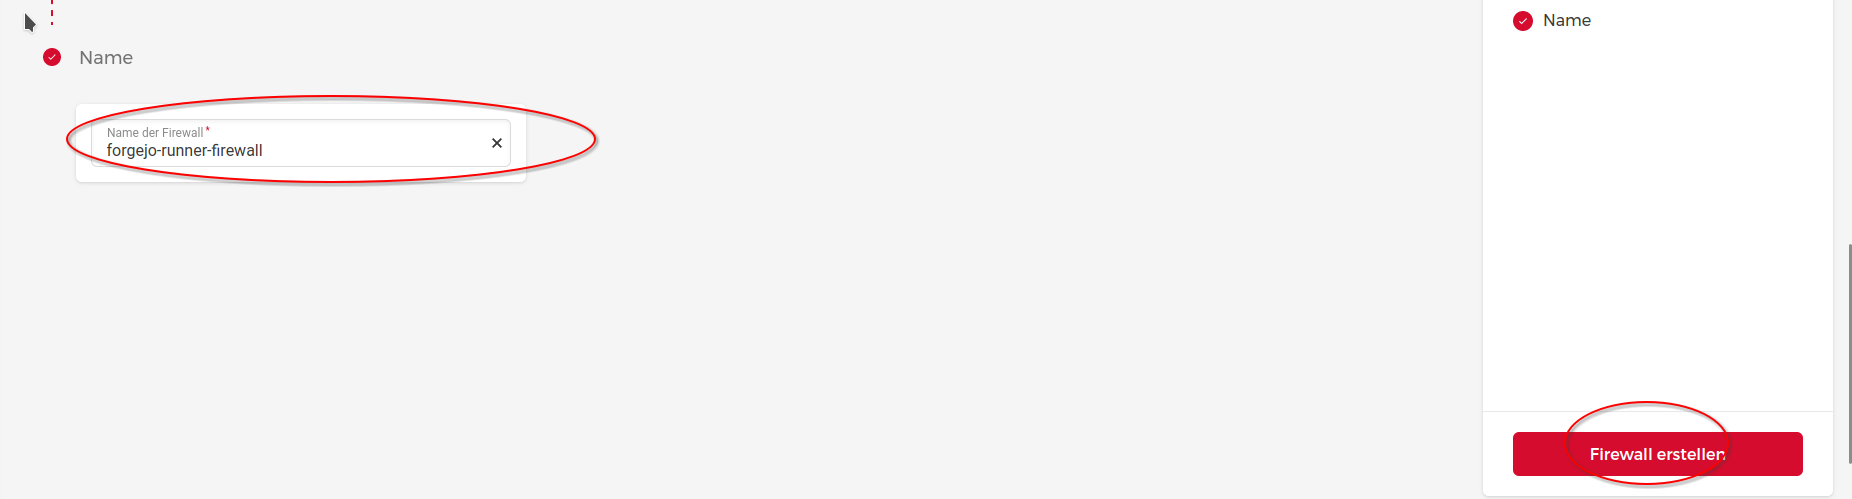
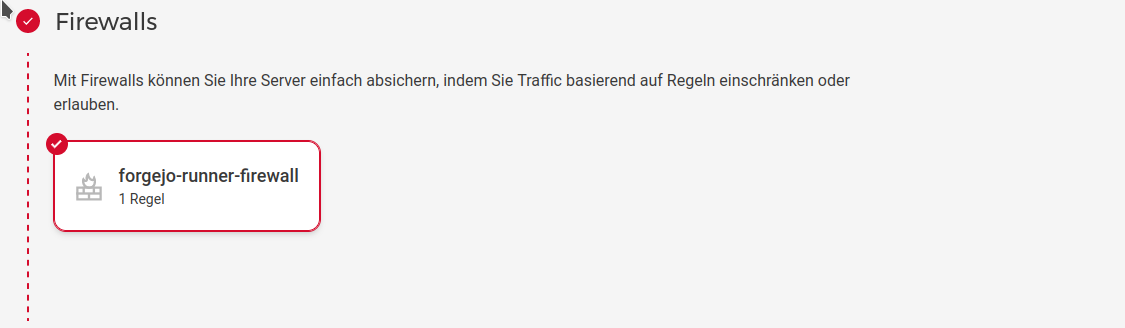
Give the firewall a name, such as "forgejo-runner-firewall" and then click on "Create Firewall"
Hetzner: Create a new server with OpenSuSE MicroOS
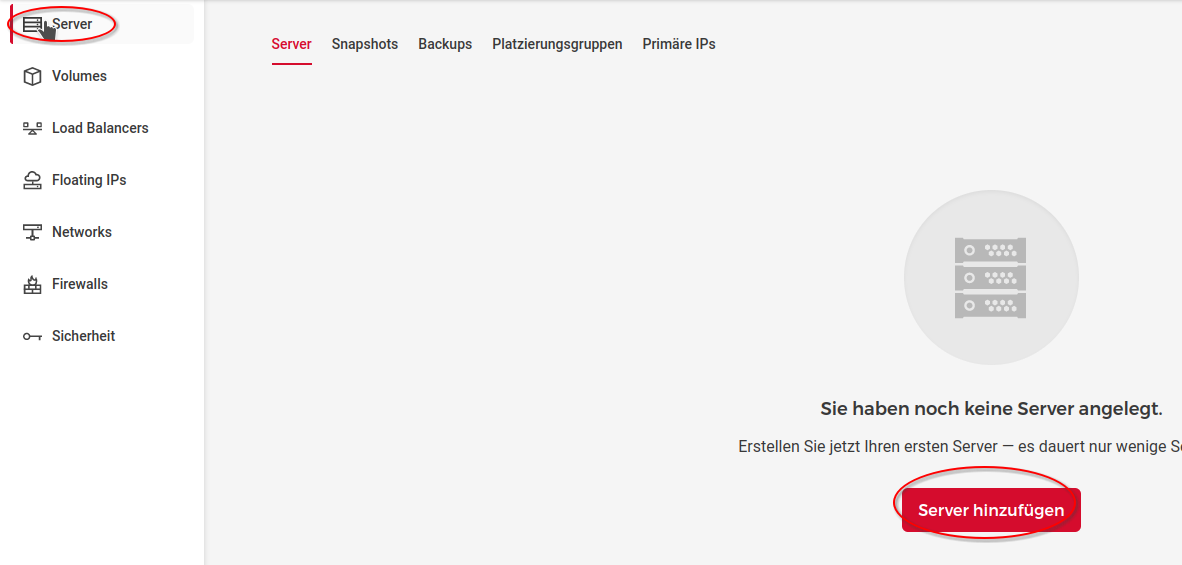
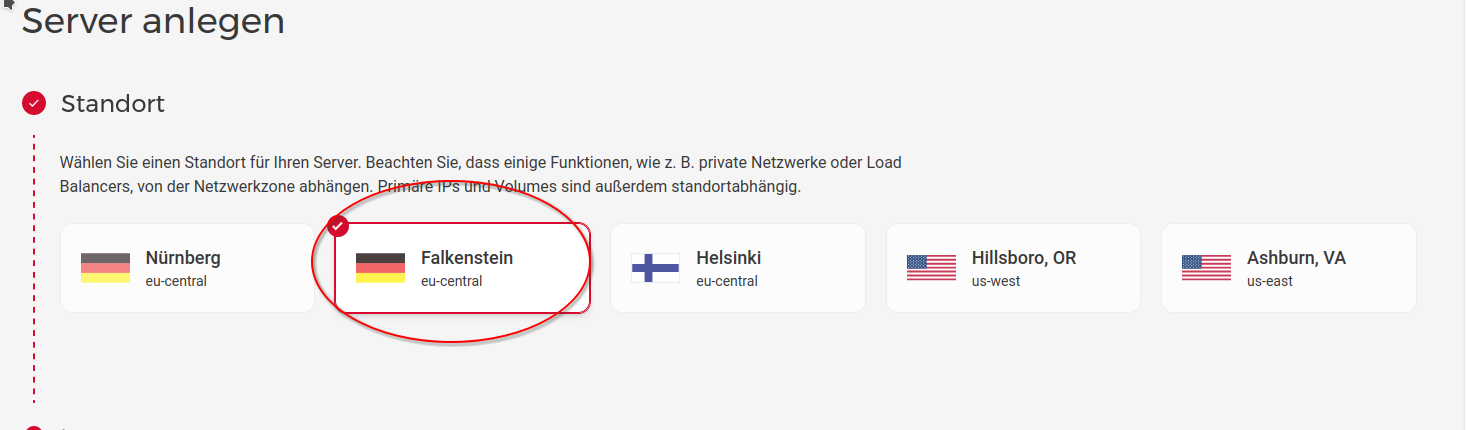
You can now create a new server. Click on the left on "Servers" and "Create new server".
Select as location the location that meets your requirements. We select here Falkenstein, Germany, Europe.
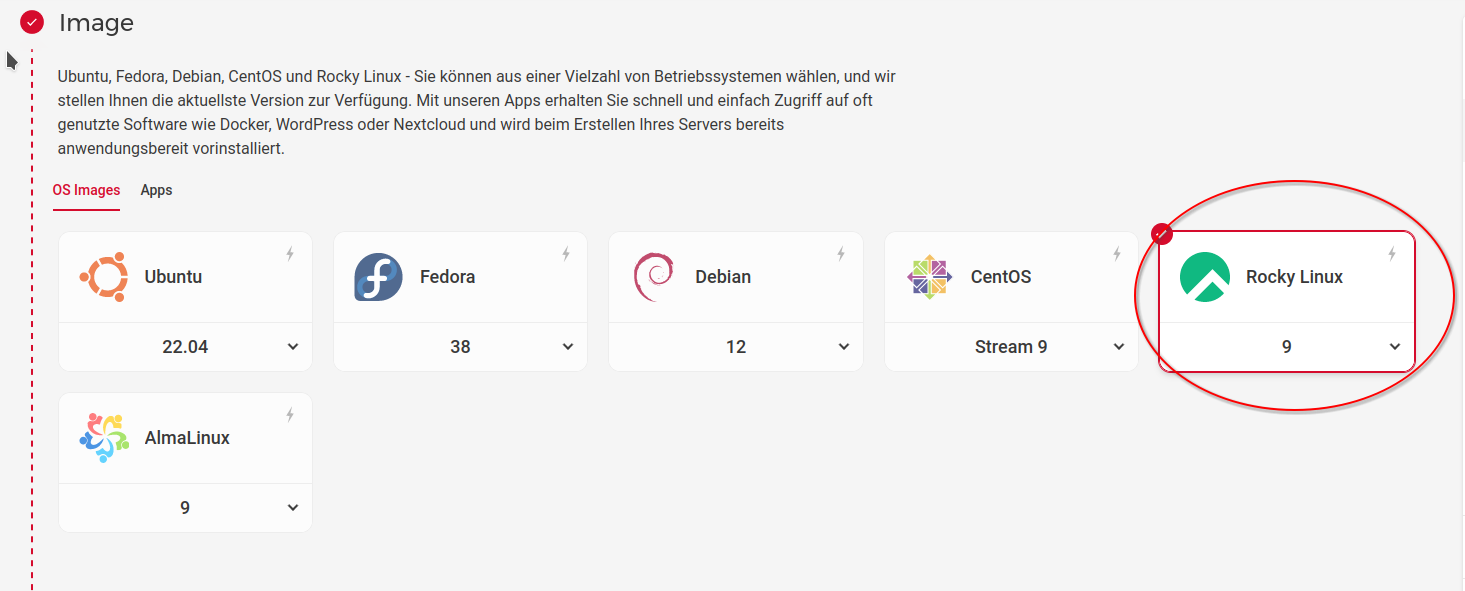
Select as an image, e.g. Rocky Linux, the exact image does not matter. We can configure it with OpenSuSE MicroOS only after server creation.
Now you can select a server type. We choose here x86, but you can also use ARM64. ARM-based servers are usually cheaper and more energy efficient. The instructions described here are the same for ARM and for x86-64.
However, to generate x86 binaries under ARM you need to be able to cross-compile your application. Depending on your type of application (e.g. if it works very close to the kernel), you may need to provide runners on both architectures for testing.
We select 2 cores and 2 GB which is often more than enough to run 1-2 pipelines in parallel.
As a next step we configure networking. Since we need Internet access (outgoing) we select public IPv6 address. Most of the servers on the Internet that you may connect support IPv6 (including codeberg.org).
We do not select IPv4 as it costs additional fees and is not needed in the modern Internet.
Additionally, we select the private network that we have created before. This can be useful if the runner needs to communicate with other servers in the private network, e.g. a server where you deploy a web application. By only communicating in a private network instead of the Internet you increase security of your infrastructure significantly.
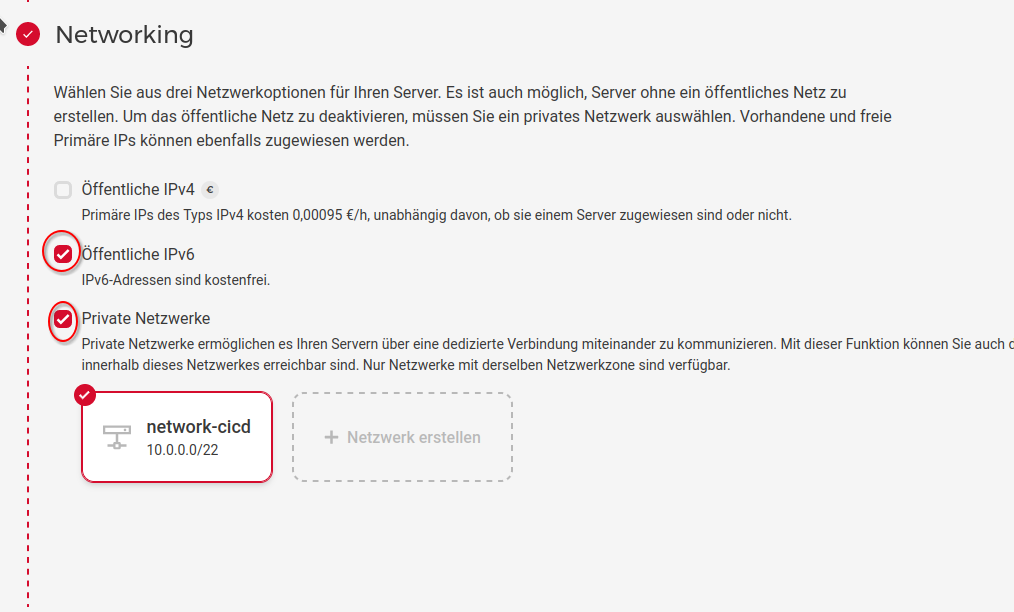
We also select the firewall that we previously created to protect the server.
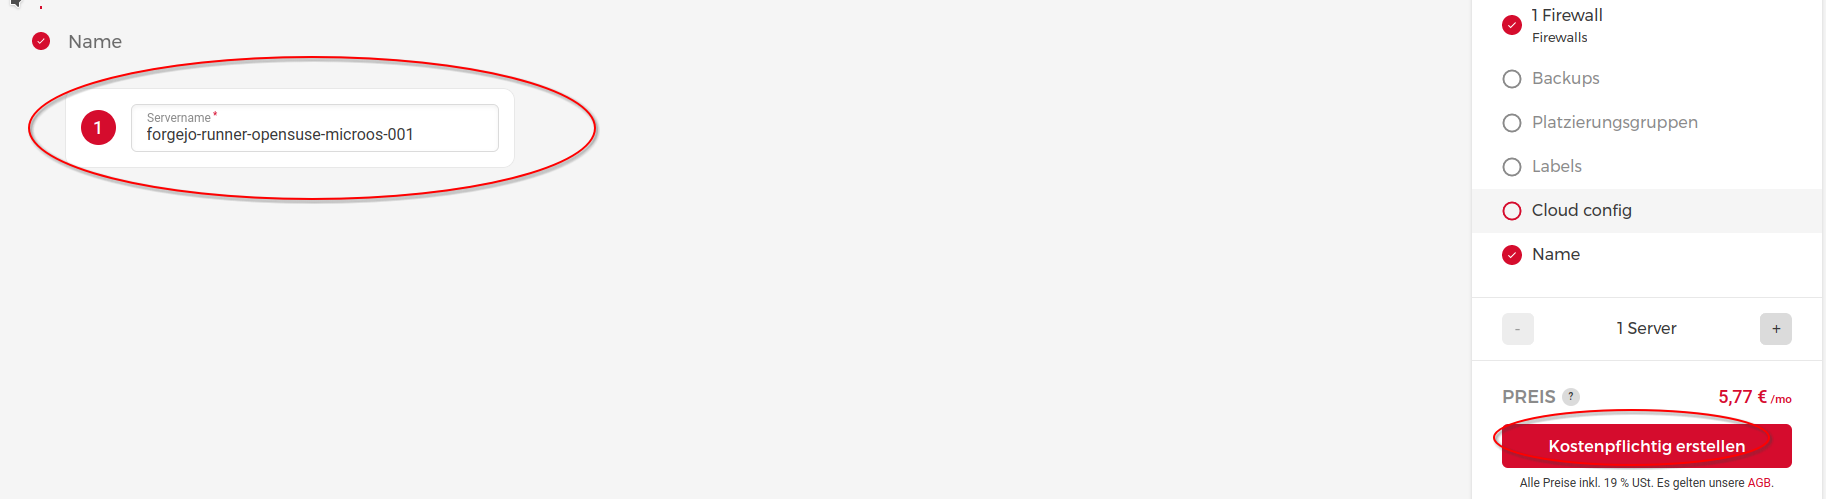
Finally, we give the server a name, e.g. "forgejo-runner-opensuse-microos-001" and click create.
Configure the server: Install OpenSuSE MicroOS
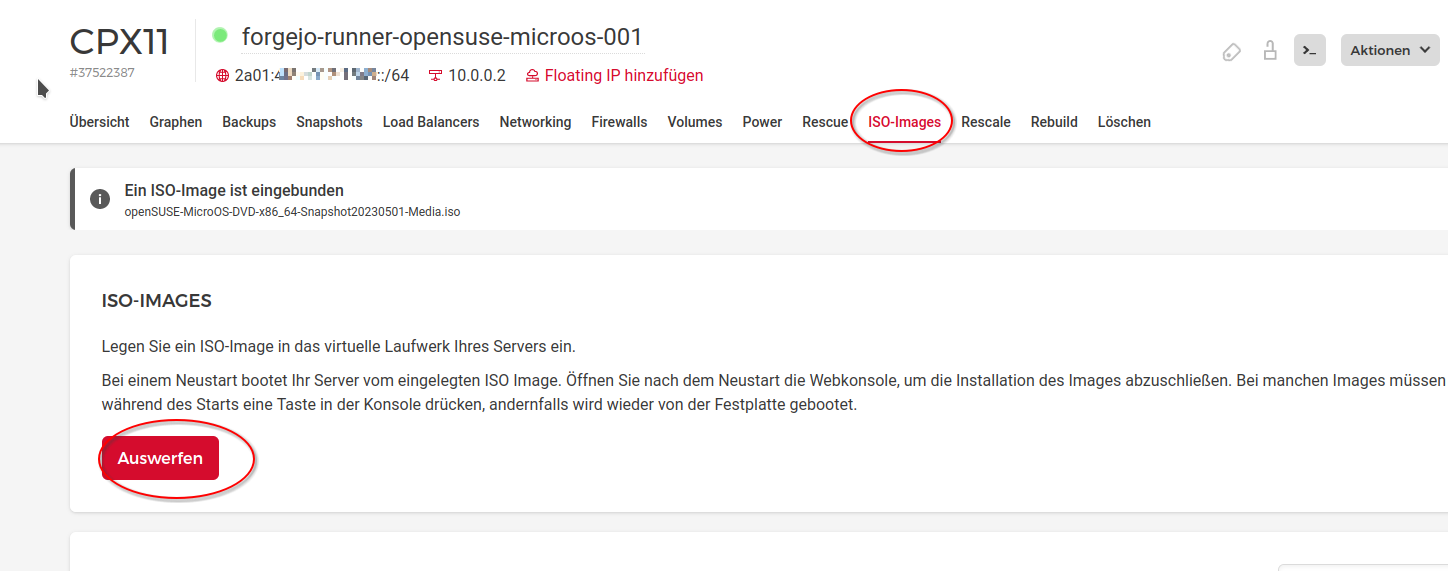
Within the Hetzner Cloud Console we select the server that we just created and click on "ISO-Images". Search for the OpenSuSE MicroOS image that you requested to add to your project.
If the support confirmed that it was added, but you cannot see it then you should clean your browser cache and restart the browser. Alternatively, they may have added it to the wrong project or architecture (x86 vs ARM) - in this case you need to contact the support again.
Click on the "Insert" button next to the image.

As a next step, we are going to the VNC Console of the server (click on the button that has the symbol "">_") and select in the console the button "Ctrl+Alt+Del" to restart the server.
You can alternatively also restart the server in the Hetzner Cloud Console under the tab "Power".
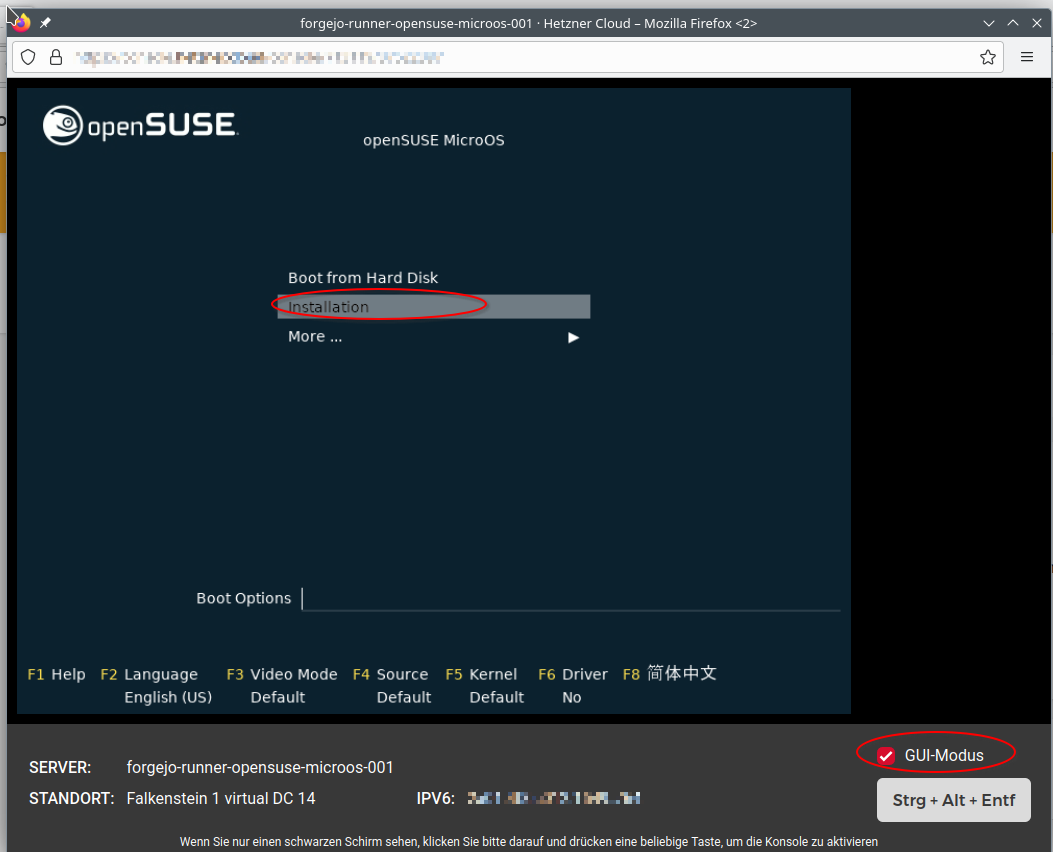
After the restart you open the VNC Console of the server (if you have closed it) and you should see the following menu, where you select "Installation".
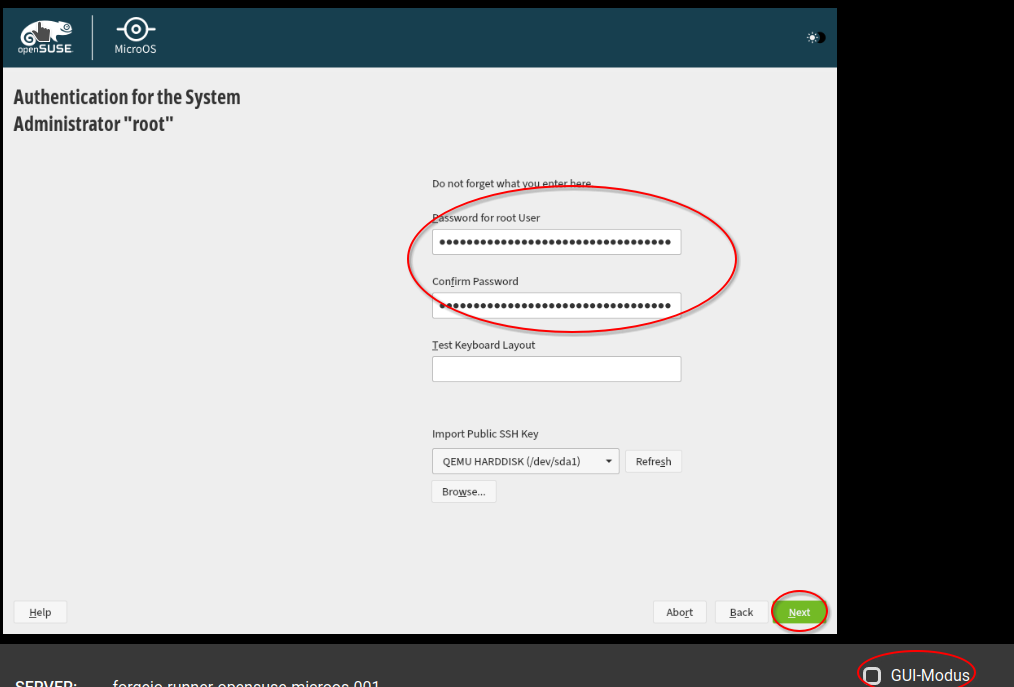
Check also the checkbox on "GUI-Mode" - this allows to use the mouse cursor in the VNC Console.
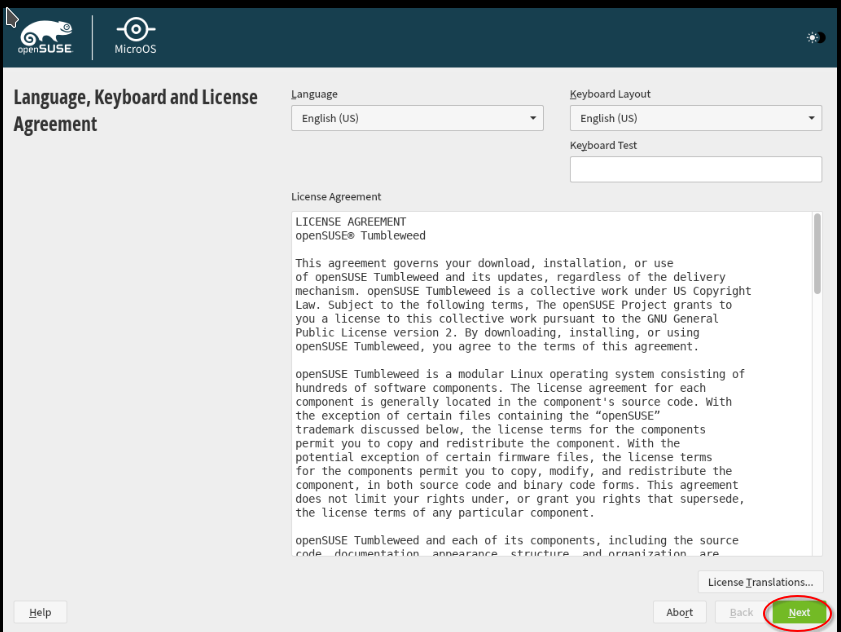
In the next step, you can accept the license.
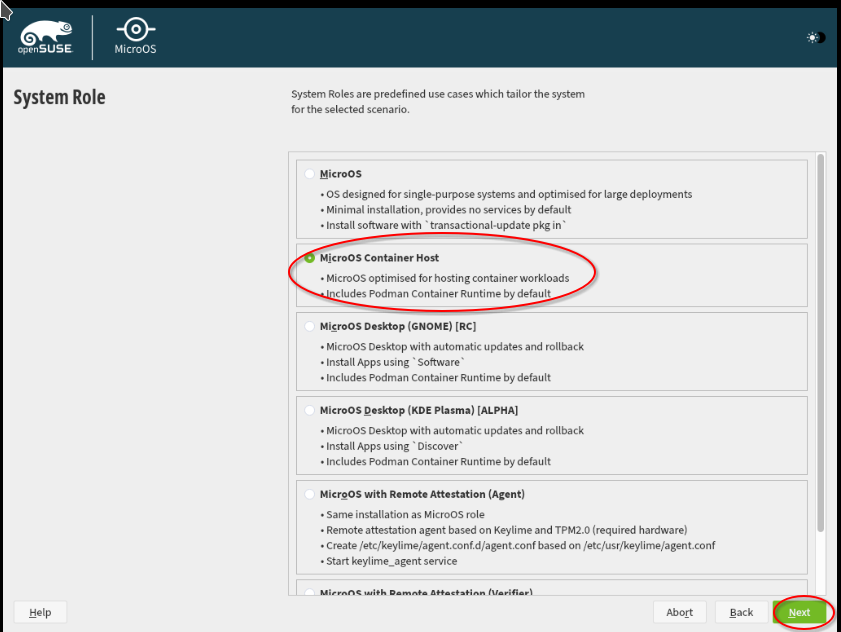
Afterwards, you can select the OpenSuSE MicroOS flavor. We select here "MicroOS Container Host" - this will allow us to enable one or more Forgejo runners deployed as containers easily.
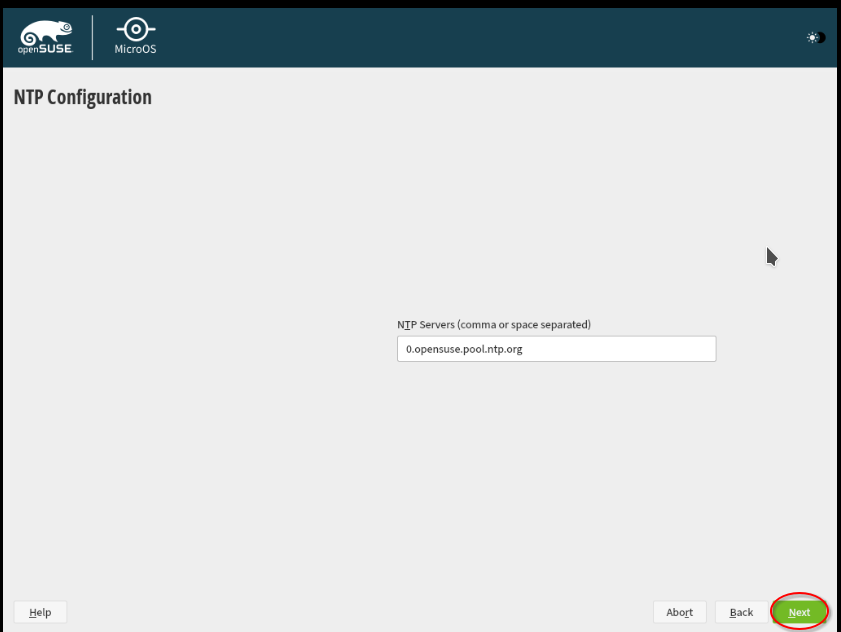
Then, you can simply confirm the timeserver to be used as proposed. Alternatively, you can use timeservers that are hosted in your region. For example, the Physikalisch-Technische Bundesanstalt (PTB, National Metrology Institute) offers multiple timeservers that are synced with their very precise atomic clock.
Configure for those "ptbtime1.ptb.de ptbtime2.ptb.de ptbtime3.ptb.de ptbtime4.ptb.de".
Next, you need to select the password of your root account. Follow password practices, such as the password guidelines by the European Union Agency for Cybersecurity (ENISA). You may also want to use a password manager, such as KeepassXC. Note: to easily copy/paste the password, e.g from your password manager, you can temporarily deactivate "GUI-Mode".
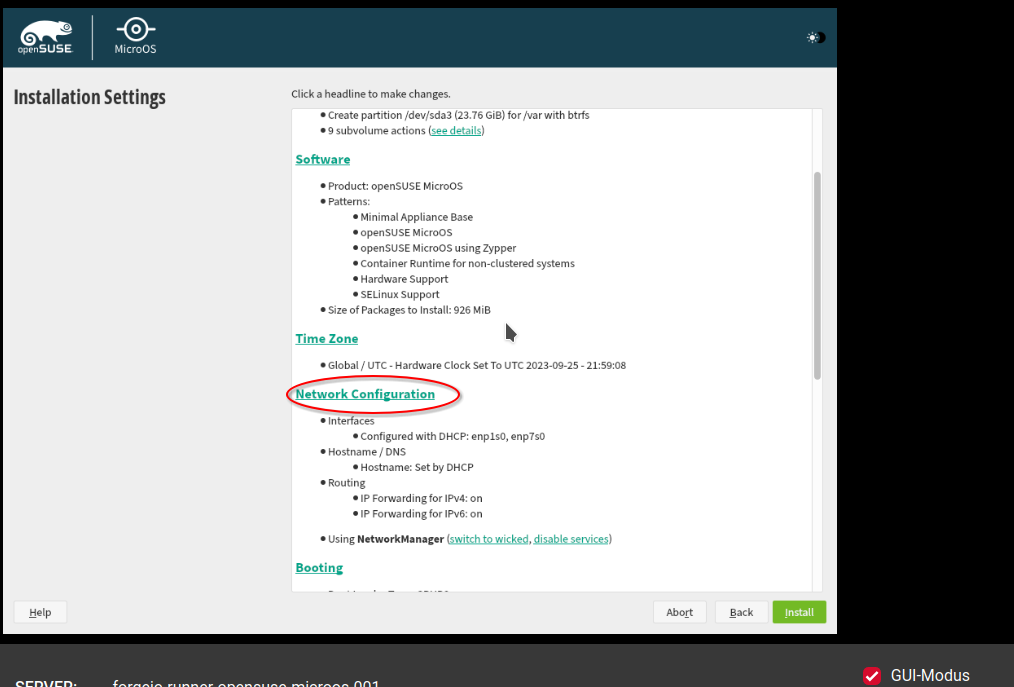
Afterwards, we configure the network. As mentioned above, we need to do this step as the Hetzner auto configuration tools are not available.
Simply click on "Networking" to start the configuration.
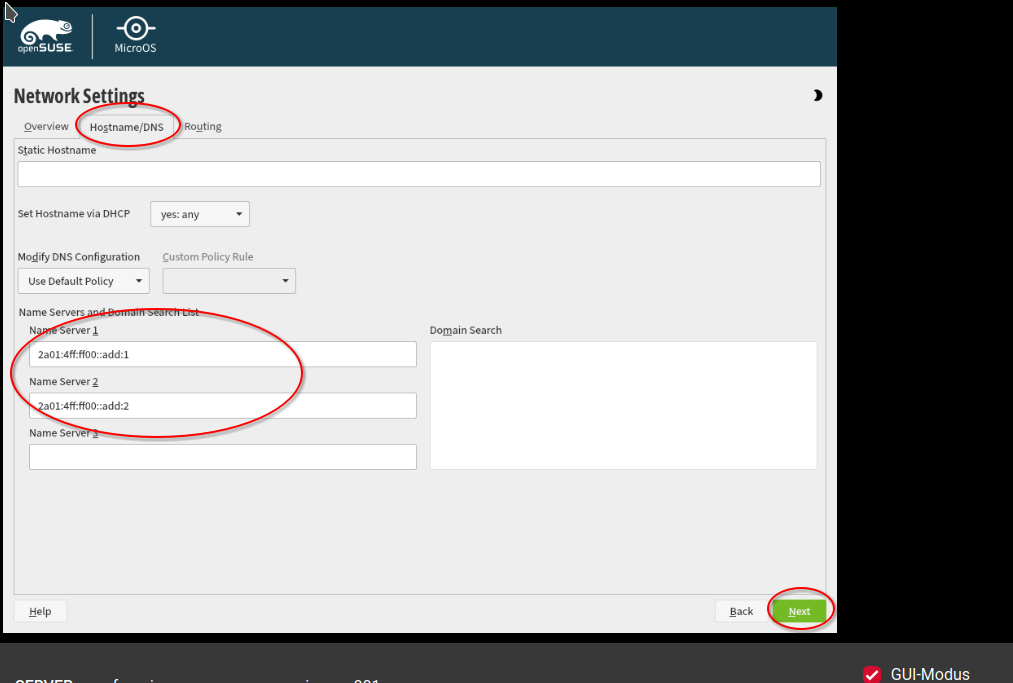
As a first measure, we configure the DNS provided by Hetzner (see here).
Go to "Hostname/DNS". Enter there the following:
- Name Server 1: 2a01:4ff:ff00::add:1
- Name Server 2: 2a01:4ff:ff00::add:2
Then, select the "Routing" tab. Deselect "Enable IPv4 Forwarding" and "Enable IPv6 Forwarding" to increase security (ie this server will not forward traffic from other servers).
Click on the "Add" button and in the dialog check "Default Route". As Gateway put "fe80::1" and as a device select "enp1s0". Click "Ok".

Go to the tab "Overview". Select the first network card and click on "Edit".

Select "Statically Assigned IP Address". Put under IP address the IPv6 address of your server. Select as "Subnet Mask": 64. Choose a meaningful Hostname, e.g. "opensuse-microos-forgejo-runner-001". Click on "Next" to finish the configuration.
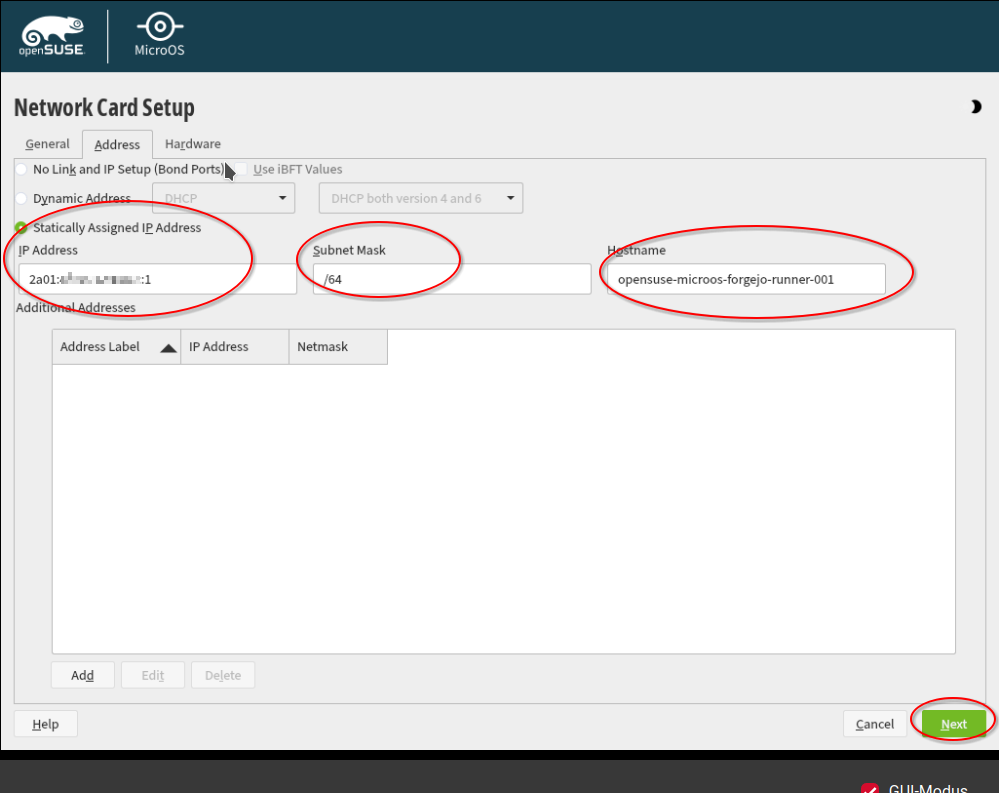
Excurse: You can find the IPv6 address of your server when you click in the Hetzner console on the server

Important: You need to add an 1 to the address when configuring it in OpenSuSE. E.g. in the Hetzner console it is: "2a01:xxx:xxxx:xxxx::/64". Then you need to configure in OpenSuSE MicroOS: "2a01:xxx:xxxx:xxxx::1".
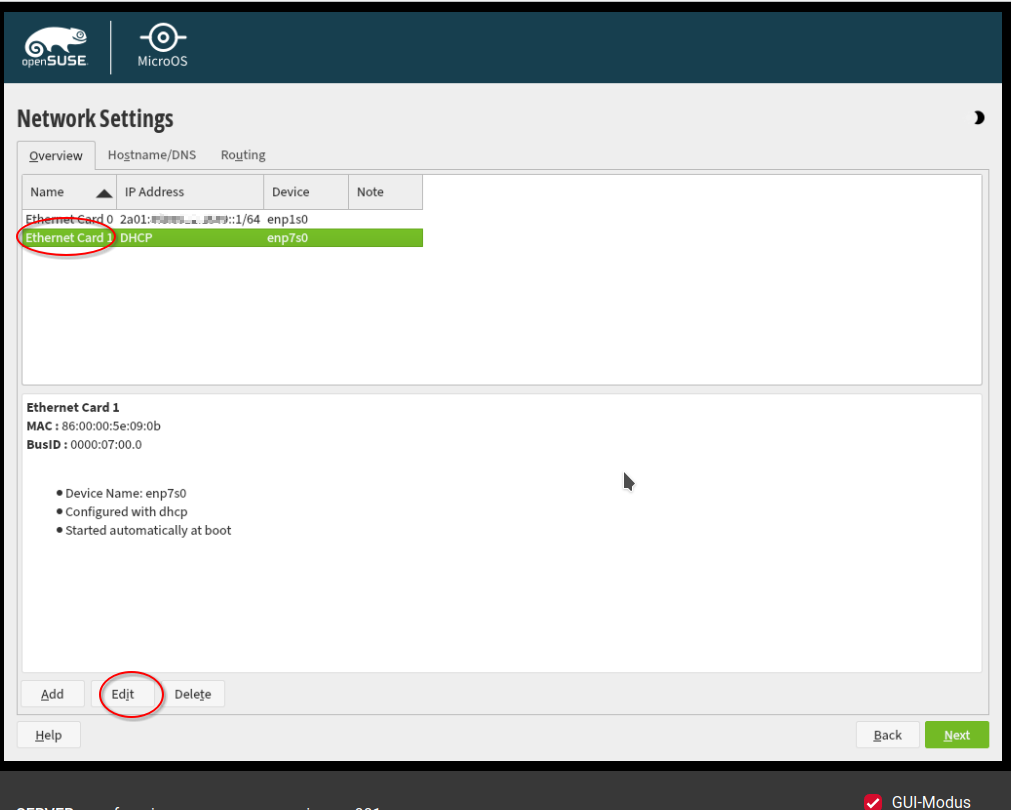
Now we configure the private network. Select in the tab "Overview" the second network adapter and click "Edit".
Select "Statically Assigned IP Address". Put under IP address the private (!) IPv4 address of your server. Select as "Subnet Mask": 32. Choose a meaningful Hostname, e.g. "opensuse-microos-forgejo-runner-001". Click on "Next" to finish the configuration.
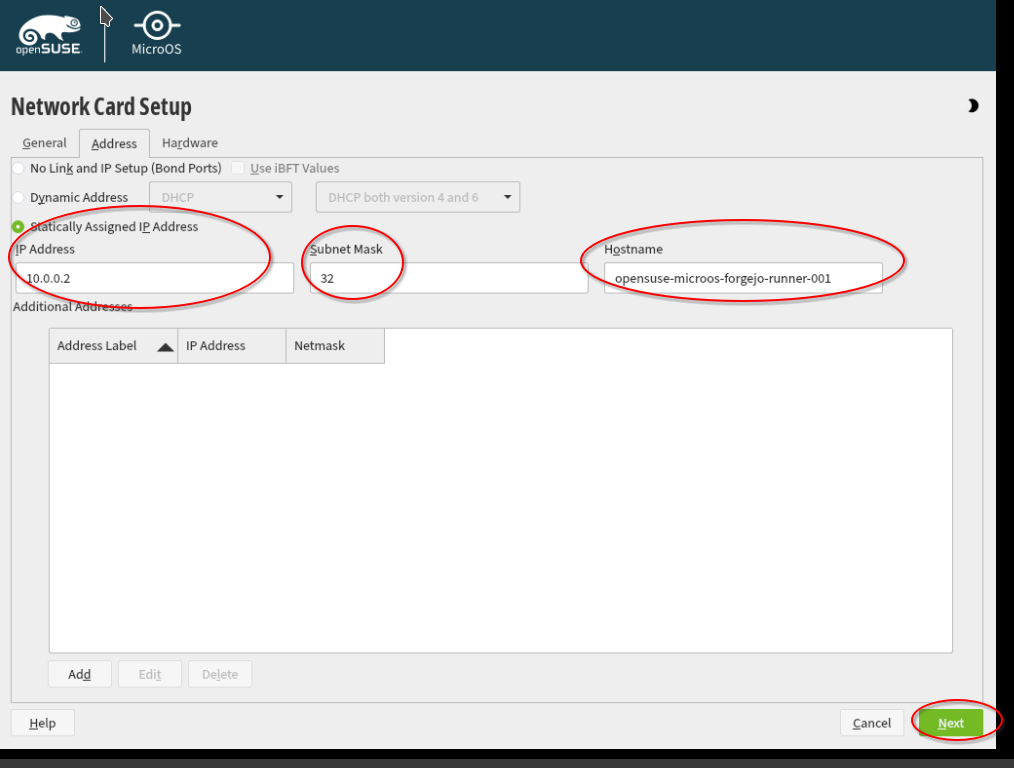
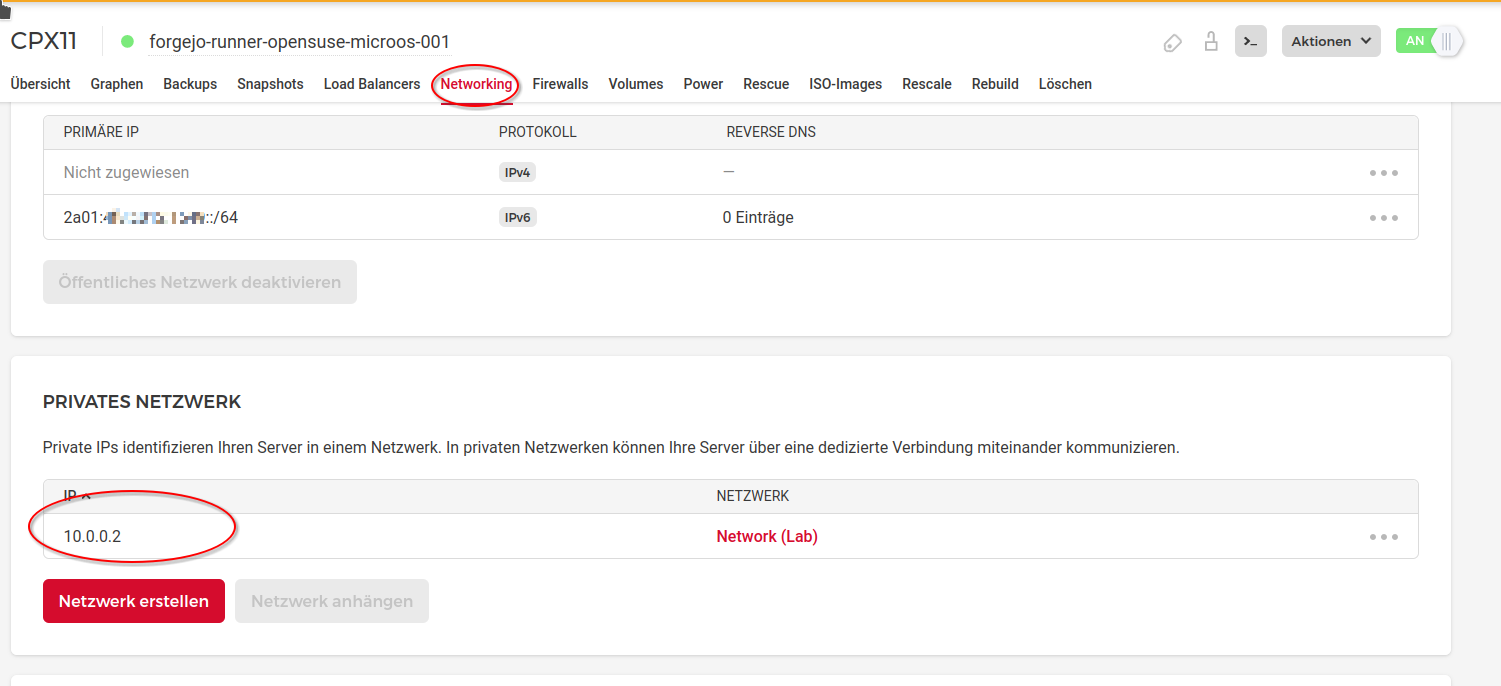
Excurse: You can find the private IPv4 address of your server when you click in the Hetzner console on the server
In order to finish the network configuration, click "Next".

Then, we click "Install".
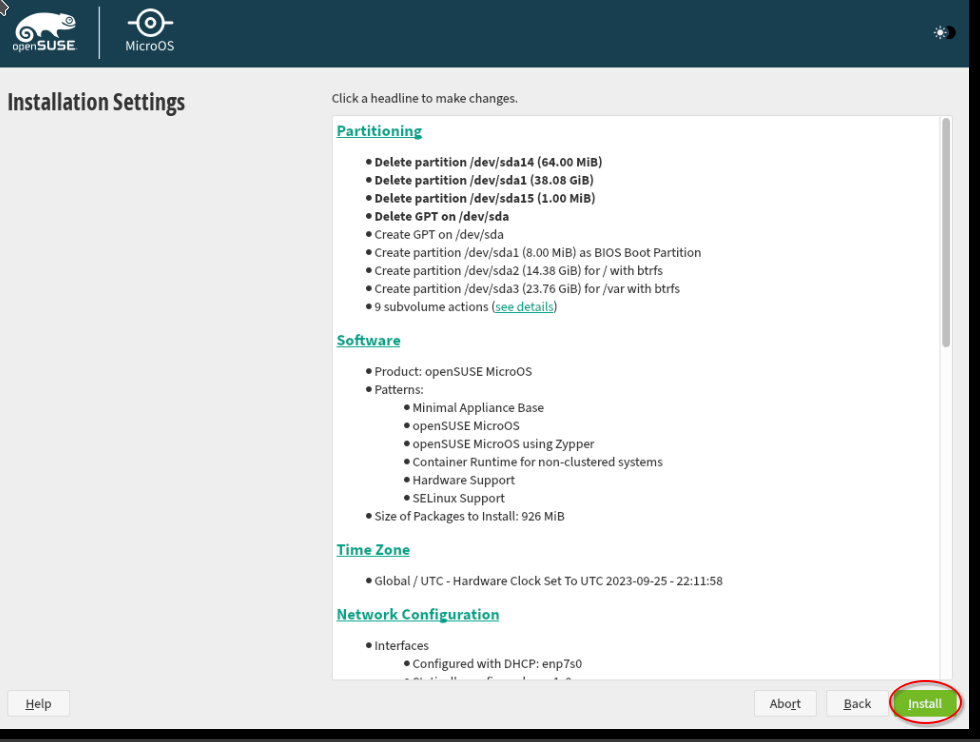
The installation now runs and afterwards you are asked to reboot. Before you reboot, do not forget to eject the ISO image containing the OpenSuSE MicroOS installation files. Go to the Hetzner console, select the tab "ISO-Images" and select the button "Eject".
Then, go back to the VNC console of the server and log into your VM with the username "root" and the password you select during installation.
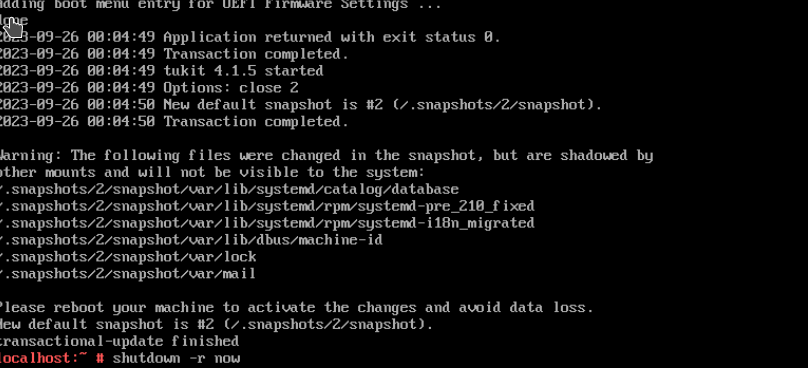
After login, run the following command "transactional-update". This updates your server and creates a new immutable btrfs snapshot. If the update is applied incorrectly or corrupting the system then during boot this is detected and you can continue with the previous snapshot (see also OpenSuSE MicroOS design) Afterwards reboot the server to apply the changes with "shutdown -r now".
Important: OpenSuSE MicroOS updates itself every 24 hours and restarts automatically (see here). Thus, the system is always up-to-date with latest security patches. This means you should also configure the forgejo-runner as a service that is automatically started using systemd.
Configure the server: Install and Register Forgejo runner
The installation can be found in the official Forgejo runner documentation.
However, in addition we will cover here how to configure the Forgejo runner on OpenSuSE MicroOS as a service, so that restarts do not affect the system.
You can have multiple Forgejo runner on the same VM if you configure each as a dedicated service.
Nevertheless, it is generally recommended to have only one Forgejo runner on the same VM due to better reliability, security and isolation, e.g. for different environments (e.g. development vs production), different organisational units or organization you should really isolate them in different virtual networks and virtual machines.
You can register a runner via the codeberg.org apis using forgejo-cli (this is for highly automated setup) OR via the codeberg.org web interface.
We describe here only the later possibility, but the scripts below can be easily adapted to the first scenario.
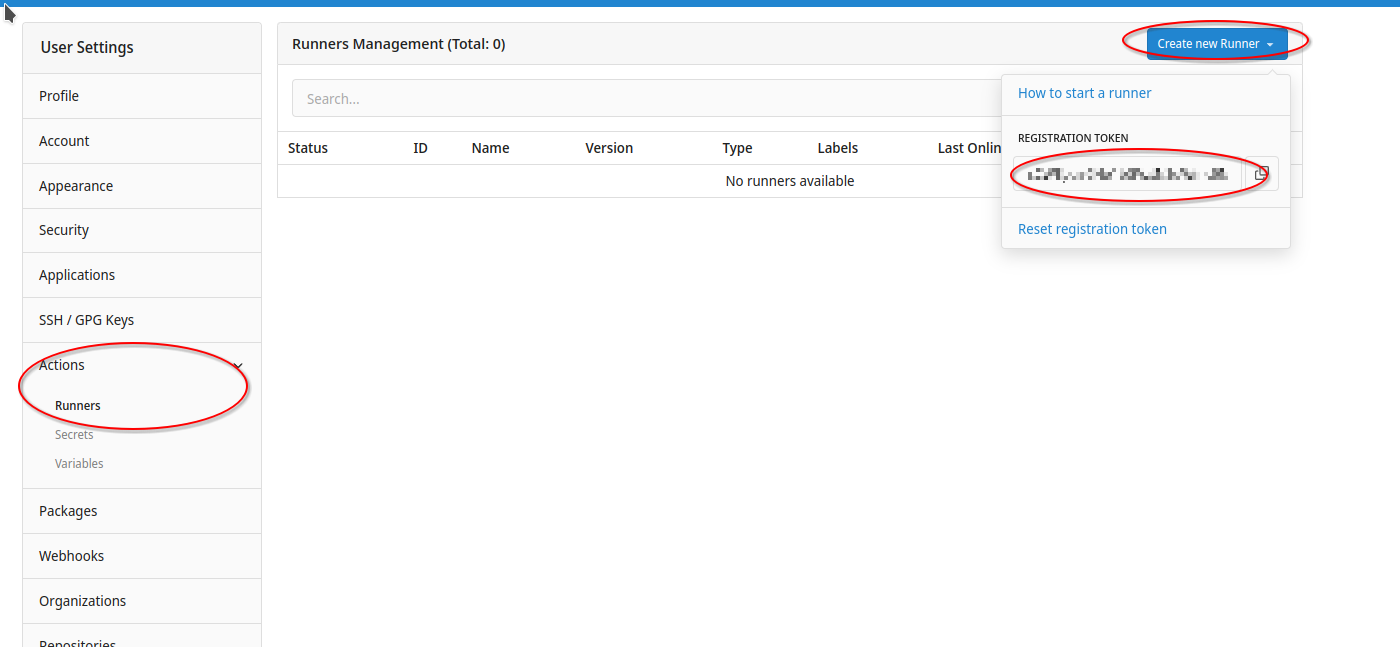
As a first step you need to create a runner in Codeberg. Go to https://www.codeberg.org.
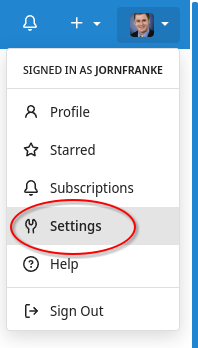
Click then on your profile on the top right and select settings (Note: if you have an organization on codeberg.org then you can also create in the settings of the organization a runner!).
Select then Actions/Runners and click on the button "Create Runner". Copy the registration token from there.
Now we go back to the VNC console as described before and login as root.
We create first a non-privileged user under which the service of the forgejo-runner should run. Never run it as a privileged user, such as root. This is a very high security risk.
Enter the following to create a system user to run the service.
Now we need to register the runner and configure it.
We need to find out what is the latest version of the Forgejo runner. You can check this here .
At the time of writing this article (07.06.2026) it was version 12.10.2.
Please replace <REGISTRATION_TOKEN> below with the registration token obtained from codeberg as described above.
Please replace 12.10.2 with the latest runner version.
Please configure the labels of the runner according to your needs. They are used in an action workflow to assign jobs according to labels. For example, if you have an ARM server you can label it as ARM and run CI/CD pipelines for ARM server on it.
The label "podman" is needed if you configure the runner also to run container images specified in the pipeline (more on this later).
You see here that we configure host as a network here. This means the container has access to the same network as the hosts is run on, which means it can access services running on localhost. At the moment, it was not possible to have an isolated network for the container with IPv6. Additionally the action cache would otherwise not be reachable. However, this will change soon and we strongly recommend to have an isolated network for the containers from the host.
The next step is to run the forgejo-runner as a service.
Make sure that you are the user under which the runner is supposed to run and NOT root by running whoami (it should NOT return root).
First we create a declarative podman-systemd container file in $HOME/.config/containers/systemd/forgejo-runner.container. You will see it is very similar to a systemd service file, but with some additional podman settings.
This example exposes the podman socket to the container. Although this is less problematic as in Docker, as the podman process runs rootless, it has still security implications. This is only needed if you need to build container images or if you need to run other container images in a forgejo-runner. Otherwise you do not need it and you can remove the corresponding line (see also shell-only runner").
Afterwards we simply register it with systemd. Enter the following commands:
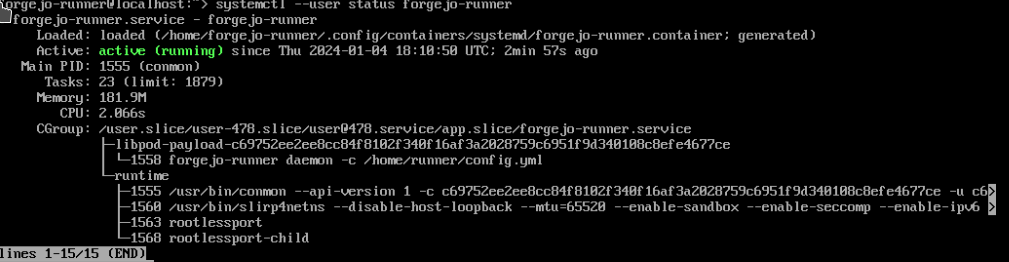
We can now test if the service is successfully started by entering
This may take a bit since it waits for the network being up.
You should see it in active:
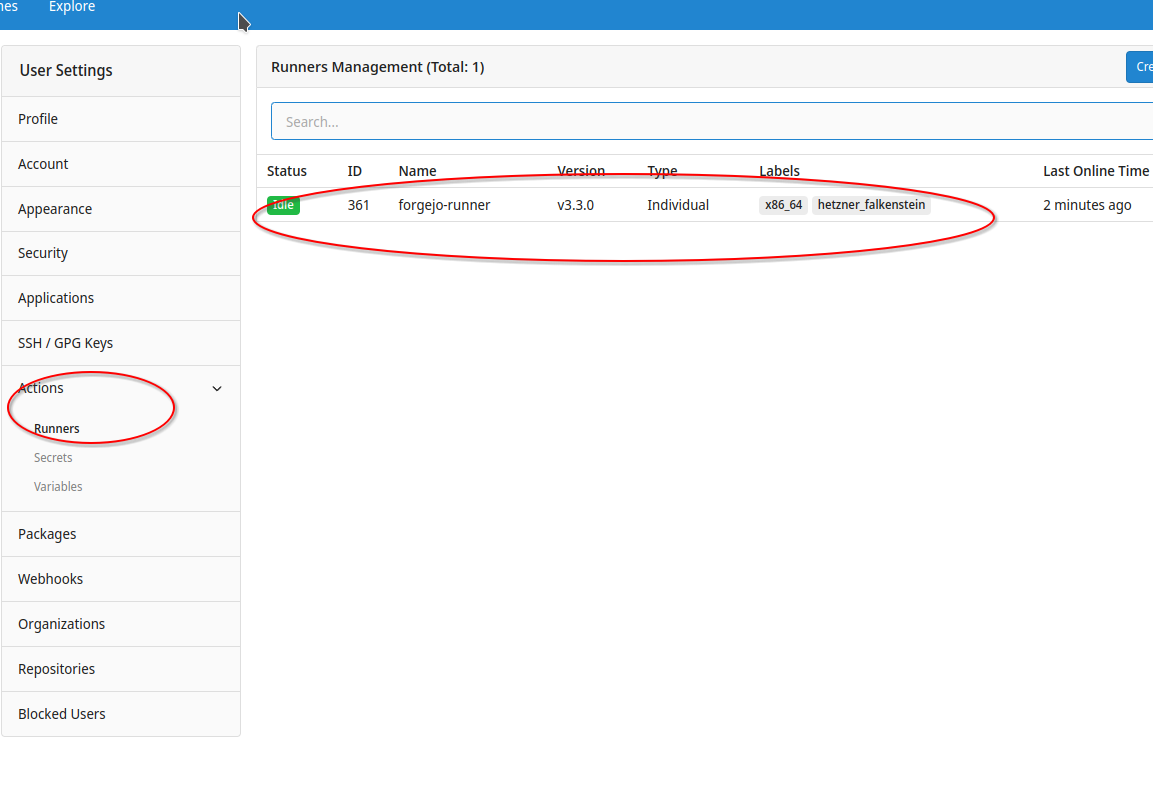
Additionally, you should go to Codeberg.org - Actions/Runners and should see that codeberg.org "sees" the runner as well:
Configuring the server: Upgrading Forgejo runner
You should regulary - at least monthly - check if there is a new version of the Forgejo Runner. We recommend also to check if any configuration changes need to be done for new releases. You can check this here . At the time of writing this article (07.06.2026) it was version 12.10.2.If there is a new version of the Forgejo Runner then we strongly recommend to update it to benefit from the latest security patches and features. CI/CD pipelines are critical for an enterprise and one of the top priorities for security hardening.
Enter the following commands to login as the user of the forgejo-runner
Follow now the same instructions described when configuring the container of forgejo-runner as service here, but with a changed version.
If - for whatever reason - the new version does not work you can use exactly the same instructions to downgrade to an older version.
Codeberg: Run a Codeberg Action job on your Forgejo runner
After you have configured your runner, you can finally use it in a Codeberg Action CI/CD pipeline.
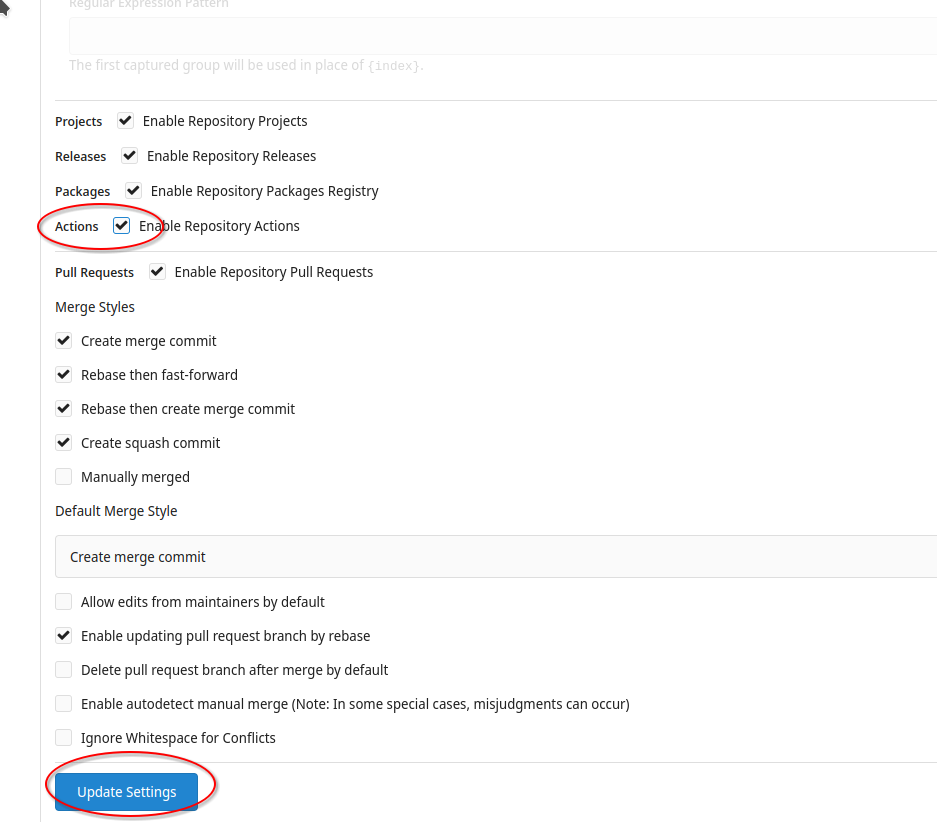
First you need to have a repository for which you want to enable actions as they are not enabled by default.
Go to your repository and click on "Settings".

Scroll to the setting "Actions" and select "Enable Repository Actions". Then click on "Update Settings".
Now you are ready to use Codeberg Actions! The documentation can provide you more details on this.
We will present you here a simple example to test your runner.
You will need to create in your repository a folder ".forgejo/workflows". Within this folder each workflow is one yaml file describing the workflow.
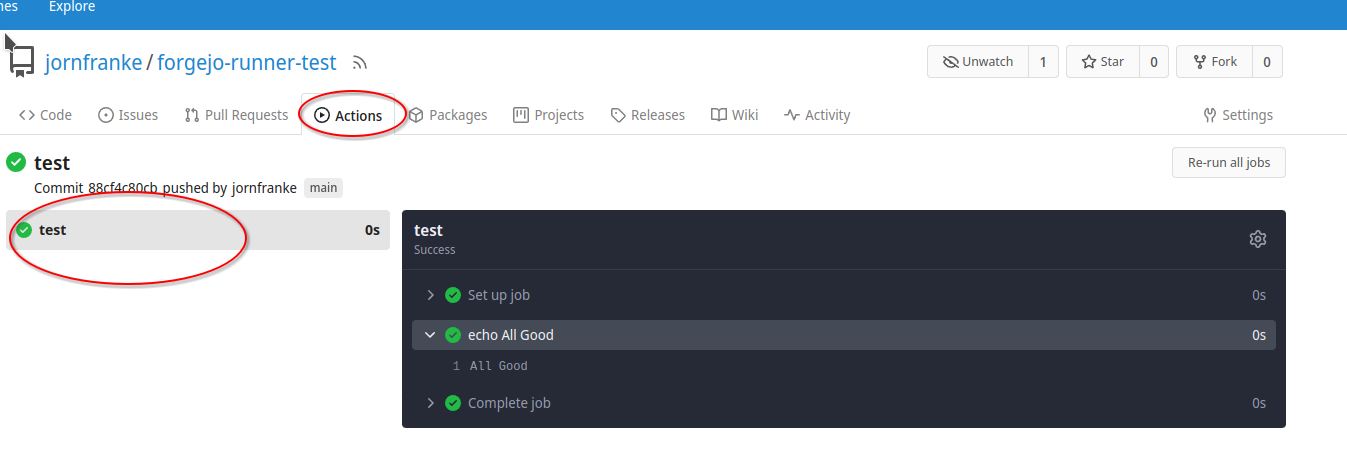
For example, we create a simple workflow called "demo.yml"
It has the following content:
This CI/CD pipeline is run every time a change is pushed to the repository. It has one job called "test". This job can run on any Forgejo Runner with the label "podman" (see RUNNER_LABELS that we defined during the registration of the runner. You can update the labels by editing the file /home/${RUNNER_NAME}/runnerconf/.runner and restarting the service).
It run one step that simply prints on the screen "All Good".
After you have pushed this file to the repository you will see that immediately the job is run (if no other job runs on the same runner).
Go to on codeberg.org to your repository and select "Actions". You can select the run and should see what it prints out.
Usually within a pipeline you need to have certain tools available (e.g. build tools for your programming language).
You do not need to install them during the Action pipeline run.
You can specify any container image within which your pipeline should be run.
They can be load from any OCI compliant container registry accessible through Internet (example: OpenSuSE Container registry, AWS Public ECR, Google Container Registry etc.) or through your own private network.
Important security hint: Make sure that you only load trusted container images where you trust the maintainer of the image, otherwise you will have malware or other things that may steal secrets in your pipeline or - depending on where the pipeline runs - may get access to your private networks. Do NOT trust labels like "official" or "verified" - they are meaningless. The best and most secure thing is if you build your own container images from scratch without any public base image.
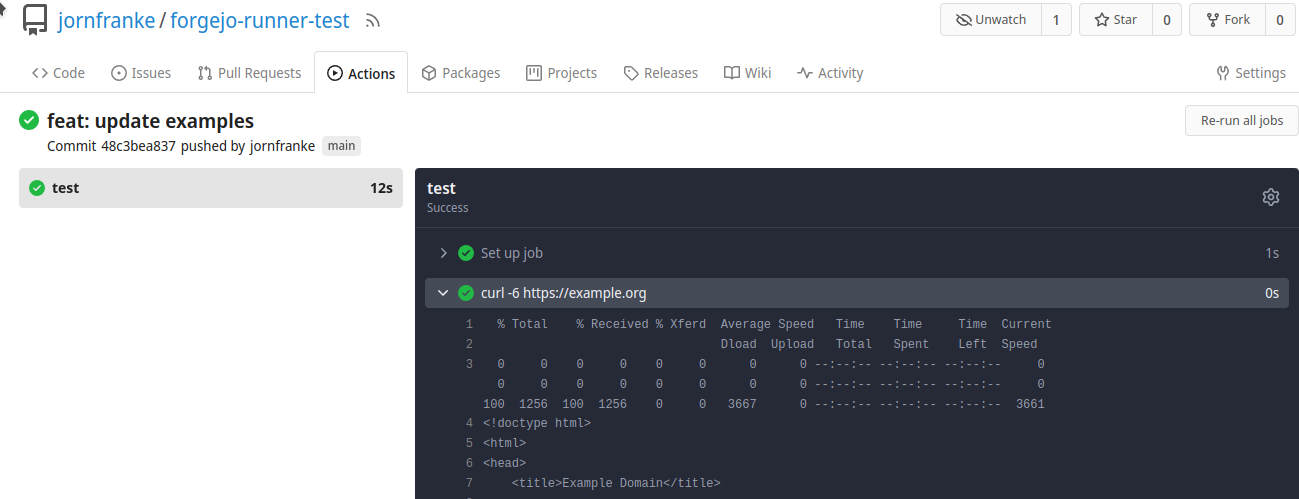
However, let us do an example of using a different container image.
This time we want to use curl to fetch the website https://example.org.
We take in the an image from the OpenSuSE Container registry: The BCI/python image.
Our Action pipeline "curl.yml" has the following content:
You will see that this pipeline runs curl (as it is part of the OpenSuSE/BCI/python image) on the host https://example.org successfully:
Find more examples here (e.g. integrating Java OpenJDK, building container images inside pipelines).
Outlook
We have shown here how to host an own forgejo runner on an IPv6-only VM using the cloud provider Hetzner so you can run CI/CD pipeline (Codeberg Actions) on your code repository on codeberg.org. Additionally, we demonstrated how to run the runner in podman rootless mode to increase security significantly. All runner data is stored on a dedicated partition, so that a pipeline cannot fill all disk space so that operating system updates become impossible. There are multiple ways on how you can move forward with this:
- Understand that you should NEVER put secrets, credentials, API keys, private keys etc. into a repository - even not a private one. Ideally use a secret vault backed by hardware or a hardened software. If this is not possible then use Codeberg secrets for Actions.
- Understand all the features you can configure in a Codeberg Action CI/CD pipeline
- Inform yourself about software supply chain security and think about how you can integrate this in this setup
- You may want to harden the firewall that we configured above. Although we disabled any ingress, having unlimited egress can imply leakage of secrets - for instance due to malicious third party library/software you use in your pipeline. Restrict the egress only to hosts that you need to access (e.g. opensuse tumbleweed/microos repositories for updates (important!), codeberg.org, pypi.org, maven central etc.). It is some effort, but definitely worth to do.
- You may want to disallow all Internet access on the podman network and require for Internet access to use a forward proxy (e.g. HAProxy can also act as forward Proxy) where you can allow-list certain Internet Urls that cannot be accessed trhoguh an artifact management solution (see next item)
- Install a repository mirror, such as Pulp (similar as the setup we did here). This mirror is a proxy for popular repositories, such as pypi, maven central etc. Then you do not need to allow the runner egress to those and configure it that it conencts to your private repository mirror. Thus increasing security and availability of your CI/CD pipeline.
- Create an own hardened container image of forgejo-runner. Currently we use the container image of the Forgejo project. However, to keep control of your environment, we strongly recommend to create your own container image, publish it on codeberg as container package (see Codeberg Package Registry) and update the configuration above to use only your hardened container image. This is more reliable and secure.
- Maybe you have many software repositories and you need to run several CI/CD pipelines concurrently. We recommend here to add additional VMs instead of running them all on the same. While container provide some isolation, it is often better to isolate at VM level so that they do not interfere with each other. This is especially important for critical software
Annex - Shell-only runner
Make sure that you login as user forgeho-runner and NOT root.
Then when following the instructions here here use the following instead to create the container file (do not forget to register systemd, ie daemon-reload)
Annex - Performance: Use Fuse for building containers
Important: Using Fuse means exposing /dev/fuse to the containers which can be a security risk. Only use if really need is demonstrated. You can build container images inside an Action pipeline without fuse (see instructions above!)
If you have performance problems when building container images (e.g. using buildah), then you can use fuse (which is normally the default). However, it requires you to expose /dev/fuse to your CI/CD containers which can be a security risk.
Make sure that you login as user forgejo-runner and NOT root.
Then when following the instructions here here use the following instead to create the container file (do not forget to register systemd, ie daemon-reload)
Then you can define an Action workflow ("buildcontainer-fuse.yml") as follows: